

Astro.jsにフォームを導入するにあたり、Netlifyにアップする前提でNetlify Formを選びました。
Formspreeのようなフォームサービスでも同じように使用できます。
Netlifyにデプロイしておく
Formを作成する前にNetlifyにAstroのプロジェクトをデプロイしておく必要があります。
Astro公式ドキュメントに従ってデプロイしておきましょう。
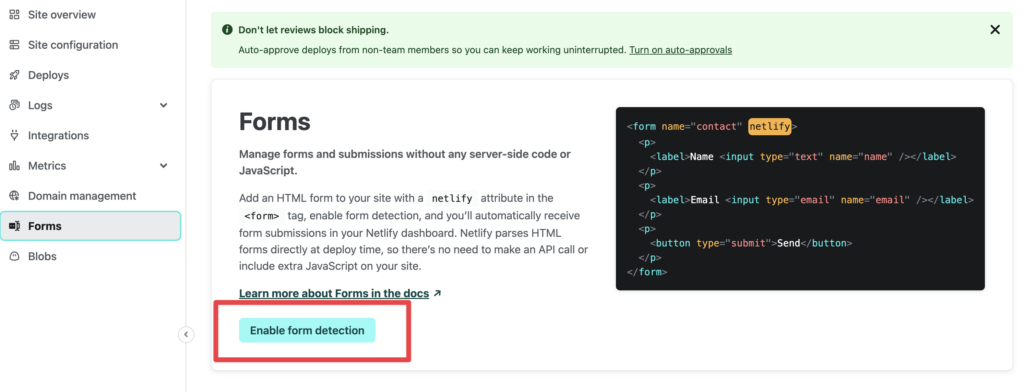
フォーム機能を有効化
Netlifyの管理画面からフォーム機能を有効化します。
Forms > 「Enable form detection」を押せばOK。
これで事前準備は完了です。
フォームの記述
コードを書いていきます。
HTML部分
Netlify Formに必要な部分は以下です。
3行目 name="contact"
5行目 data-netlify="true"
あとは好きなように記載してください。
<form
  id="js-contactForm"
  name="contact"
  method="POST"
  data-netlify="true"
>
  <div class="formParts">
    <dl class="item">
      <dt class="title">
        <label class="label required" for="yourName">お名前</label>
      </dt>
      <dd class="entry">
        <input
          type="text"
          id="yourName"
          name="お名前"
          placeholder="しょうみゆ"
          required
        />
      </dd>
    </dl>
    <dl class="item">
      <dt class="title">
        <label class="label required" for="yourEmail"
          >ご返信先(メールアドレス)</label
        >
      </dt>
      <dd class="entry">
        <input
          type="email"
          id="yourEmail"
          name="ご返信先"
          placeholder="info@shomiyu.com"
          required
        />
      </dd>
    </dl>
    <dl class="item">
      <dt class="title">
        <label class="label required" for="message">お問い合わせ内容</label>
      </dt>
      <dd class="entry">
        <textarea
          name="お問い合わせ内容"
          id="message"
          placeholder="内容をお書きください"
          required></textarea>
      </dd>
    </dl>
  </div>
  <div id="js-formStatus"></div>
  <button class="sendButton" id="js-submitButton" type="submit">送信する</button
  >
</form>
スクリプト(Thanksページあり)
純粋な静的サイトと違ってAstroの場合はスクリプトが必要になります。
同じファイル内に記載以下のように記載します。
この場合、HTMLのほうで<div id="js-formStatus"></div>は不要なので削除してください。
18行目のパスをthanksページのものにして使用します。
<script is:inline>
  const form = document.getElementById("js-contactForm");
  const submitButton = document.getElementById("js-submitButton");

  async function handleSubmit(event) {
    event.preventDefault();
    submitButton.textContent = "送信中です...";
    const data = new FormData(event.target);
    fetch(event.target.action, {
      method: form.method,
      body: data,
      headers: {
        Accept: "application/json",
      },
    })
      .then((response) => {
        if (response.ok) {
          window.location.href = "/contact/thanks/";
        } else {
          response.json().then((data) => {
            if (Object.hasOwn(data, "errors")) {
              const errorMessage = data["errors"]
                .map((error) => error["message"])
                .join(", ");
              console.log(errorMessage);
            }
          });
        }
      })
      .catch((error) => {
        console.log(error);
      });
  }
  form.addEventListener("submit", handleSubmit);
</script>
スクリプト(ページ遷移しない&メッセージ出力)
Thanksページの利用がない場合はボタンの上にメッセージを出力する形も有効です。
以下のスクリプトは送信ができたらボタン上にテキストが表示される例です。
(HTMLをいじれば表示位置を変更できます)
<script is:inline>
  const form = document.getElementById("js-contactForm");
  const submitButton = document.getElementById("js-submitButton");
  const status = document.getElementById("js-formStatus");

  async function handleSubmit(event) {
    event.preventDefault();
    submitButton.textContent = "送信中です...";
    const data = new FormData(event.target);
    fetch(event.target.action, {
      method: form.method,
      body: data,
      headers: {
        Accept: "application/json",
      },
    })
      .then((response) => {
        if (response.ok) {
          status.textContent = "お問い合わせありがとうございます。";
          form.reset();
        } else {
          response.json().then((data) => {
            if (Object.hasOwn(data, "errors")) {
              status.textContent = data["errors"]
                .map((error) => error["message"])
                .join(", ");
            } else {
              status.textContent = "送信エラーです。";
            }
          });
        }
      })
      .catch((error) => {
        status.textContent = "送信エラーです。";
      })
      .finally(() => {
        submitButton.textContent = "送信する";
      });
  }
  form.addEventListener("submit", handleSubmit);
</script>
Netlify にデプロイ
NetlifyにデプロイしてFormが検出されているのを確認しましょう。
検出されると以下のようにformタグのnameで指定したものが表示されます。
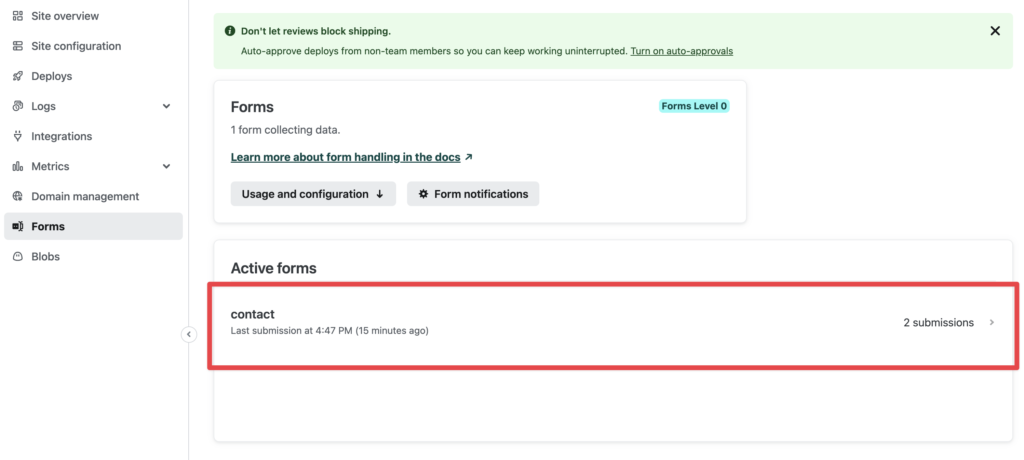
ここまでできたらテスト送信してみましょう。無事に送信できたら完了です!
参考
とっても助かりました!
AstroにFormspreeでお問い合わせフォームを実装する
0